Webify
A python utility for generating static websites and course notes.
Webify uses pandoc to convert markdown documents in html webpages, LaTeX articles, and beamer slides. Webify is designed primarily to create course content for math-oriented or programming heaving courses, since it supports both code syntax-hilighting and LaTeX mathematical notation. It supports both Jinja2 and Mustache templating engine that can process data stored in yaml files and yaml front matter within markdown files to create beautiful documents and websites.
First, some history. Back in 2017 I was getting increasingly frustrated with using Microsoft PowerPoint and Apple Keynote for creating my course slides. While both are excellent presentation softwares, with extensive multimedia capabilities, neither supported including 1) code listings with automatic syntax highlighting and 2) LaTeX mathematical notations. I was able to get around these shortcomings by relying upon custom scripts and third-party tools, such as LaTeXIt. It was tedious, and I was searching for a tool that would allow me to create static course content for programming and math-oriented courses.
I was aware of the LaTeX ecosystem for creating technical documentation. I have been using LaTeX for many years, and my graduate students have used Beamer before for creating presentations. LaTeX and Beamer looked promising for creating course content for my courses. As I was pondering moving over to the LaTeX ecosystem for creating course content, I stumbled upon markdown and pandoc.
Markdown is a lightweight text markup language, which can be used to specify simple formatting instructions. A number of markdown extensions also support mathematical notations using LaTeX and code blocks.
Pandoc is a document conversion utility written by John MacFarlane. Pandoc supports conversion from/to a document written in markdown to other popular formats, including html, LaTeX, beamer slides, Microsoft Word, etc. Most importantly for me, pandoc can convert markdown documents to HTML and PDF. Pandoc uses a number of typesetting engines, including pdflatex, xelatex, and lualatex, to convert markdown documents into PDF, and pandoc is able to create both LaTeX-type articles and beamer-style presentations from markdown documents. In addition, pandoc supports markdown code-listing and LaTeX mathematical notation extensions.
I decided to go with markdown+pandoc combination. From henceforth I shall develop my course content in markdown, and I would use pandoc to convert my notes into the desired format (html, LaTeX articles, or a beamer slides). This combination, I felt, met my requirement of using plain text to create course content.
Webify Python Utility
This led me to develop webify. A python utility to create blog aware, static websites from plaintext. Webify “duplicates” each file found in the source directory at the destination directory according to the following three rules:
A markdown file is converted to the desired format using pandoc utility. Currently, webify supports markdown-to-html, markdown-to-LaTeX-article (pdf), and beamer-slideshow (pdf) conversions. When markdown file is converted to html, the process also allows for the possibility of consuming markdown contents within a mustache or jinja template.
An html file is processed through mustache or jinja templating engine.
All other files are copied as is.
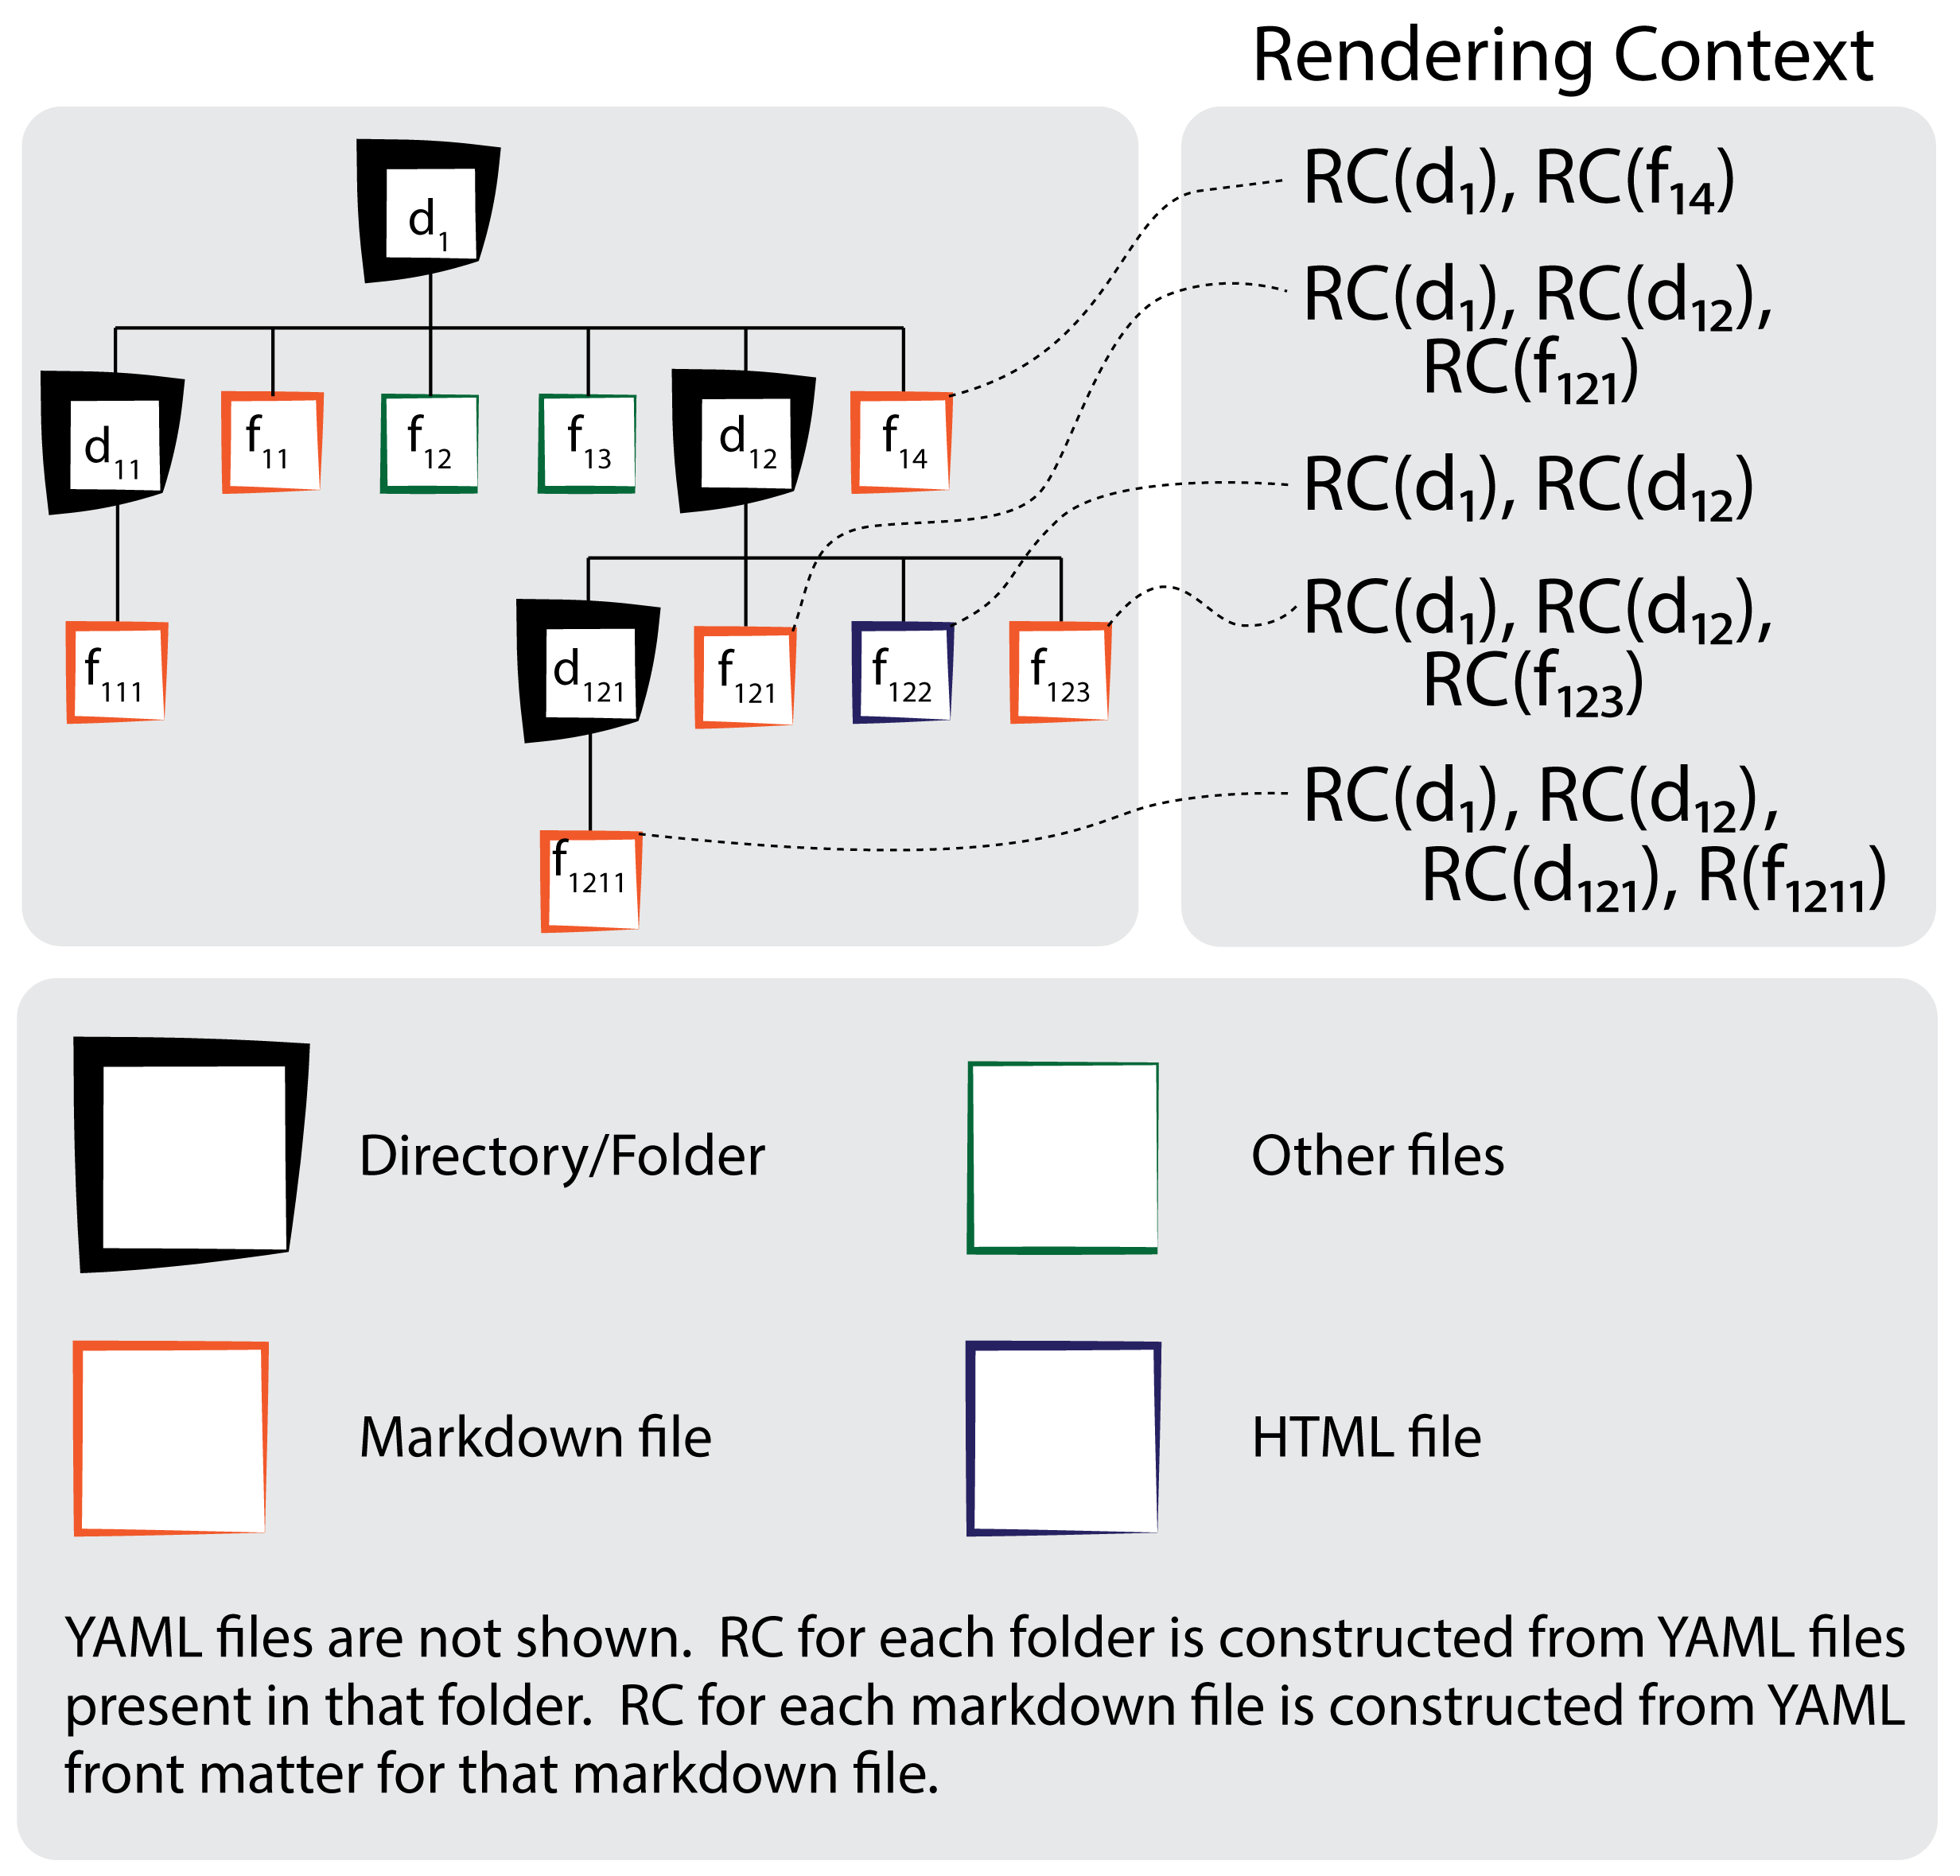
Information stored in yaml files is available as the rendering context (for mustache or jinja renderers). The rendering context for each markdown file is constructed using information found in:
- [A] Yaml files in ancestor folders (up to the root directory); and
- [C] Yaml files in the current folder; and
- [F] Yaml front matter found in the current file.
In case of key collisions, the following preference ordering is used: A < C < F. The following figure illustrates how rendering context is constructed for each file.
Webify is similar to Jekyll in many respects. However, there is a key difference. Webify supports plaintext to LaTeX articles and Beamer slideshow conversion. I did not find a straightforward way to accomplish this when I played around with Jekyll.
The rendering context
Consider the following scenario.
example1
├── a
│   ├── a.md
│   └── a.yaml
└── main.yaml
The rendering context for file a.md will include information from both main.yaml and a.yaml files, in addition to the information stored in its yaml front matter. Say the contents of main.yaml are:
---
title: Webify test site
name: Winnie
and the contents of a.yaml file are:
---
name: Tigger
author: Bugs bunny
keyword: tigger
and the contents of a.md file are:
---
keyword: stuff
---
Important stuff.
then the rendering context for a.md will be:
title: Webify test site
name: Tigger
author: Bugs bunny
keyword: stuff
Global rendering context
Webify adds the following entries to the top-level rendering context.
__root__ key contains relative path to the root folder always.
Mustache vs Jinja Rendering
Jinja is a full-featured templating engine for Python. Mustache on the other hand is a logic-less templating engine. Mustache is much easier to use; however, it cannot really be used in complicated settings that require some sort of logic to be executed.
The most important thing to keep in mind is that while mustache can deal with keys with dashes (-); where as, jinja cannot. If you want to use keys in a jinja template, use underscore instead (_).
For example:
can be used in a mustache template using {{object-id}}; however, it cannot be used within a jinja template. Use instead
which can be used in jinja template using {{object_id}}.
Aside: you’ll notice that both webify and mdfile use dashes (-) for certain keys internally. This is intentional. I find dashes (-) to be more readable. Internal keys that are available to be used during rendering start with a double underscore __.
The _partials folder
Each time webify processes a folder, it first looks whether or not the folder contains a sub-folder, called _partials. If a _partials sub-folder is found, then items within this folder are processed. Items within the _partials sub-folder are added to the rendering context for its parent folder. This allows a mechanism to create common web-snippets, such as headers, footers, and navigation items, that can be used in any file that is stored in this (the parent of _partials) folder or one of its sub-folders.
Consider the following situation.
example2
├── _partials
│   ├── footer.html
│   ├── header.html
│   ├── nav.md
│   └── nav.yaml
└── index.md
Here, the rendering context for index.md file includes the entries, footer_html, header_html, and nav_md. Each of these entries correspond to the processed footer.html, header.html, and nav.md file contents.
.webifyignore for ignoring files and folders
File .webifyignore serves a similar purpose to .gitignore. Files or folder added to .webifyignore file are ignored by webify utility. An example .webifyignore is provided below.
_templates
*~
.*
.git
.gitignore
.DS_Store
\#*
.pynb_checkpoints
Copying source markdown files to the destination
Webify’s default behavior is to process markdown files to create 1) LaTeX articles, 2) beamer slides, or 3) html pages. This means that webify does not copy the source markdown file to the destination. E.g., a markdown files example.md will be appear as either example.pdf (cases 1 and 2) or example.html (case 3) at the destination location. Sometimes however it is desireable to copy the source markdown file to the destination location. This can be achieved by using the copy-source flag in the yaml front matter as follows.
The markdown source for this html file was copied using this mechanism. Without this flag, lorem-html.md will not be available in the desitnation folder.
Ignoring markdown files
Use to ignore key to force webify to ignore a markdown file during website generation. The same effect can be achieved by adding this file to the .webifyignore file.
Webify will not process the above file. The default value for ignore is False.
Time depended availability
It is possible to specify availability, i.e., start time and end time, for any file in the “current folder” by including this information in a yaml file as follows
---
availability:
  - file: file1.md
    start: 22 June
    end: 23 June 6 pm
  - file: file2.html
    start: 4 June 12 pm
  - file: file3.png
    end: 31 May 2020 11:59 pm
Note that availability information is folder specific, and it only applies to files present in that folder. Files for which no availability information is specified are always available. In the above example, file1.md will only be available between 12 am, June 22 and 6 pm June 23. file2.html will be available after 12 pm June 4. Similary file3.png will be available before 11:59 pm May 31, 2020.
Note also that if you are not running webify in the background (check out the --live option), you will have to periodically run it for any changes to take effect.
In addition also note that webify currently doesn’t support timezone aware time processing.
Time dependent processing for markdown files
Use availability key in the front matter to enable time dependent processing.
Folder level availability overrides file level availability information.
YAML front matter: pandoc filtering
It is possible to apply text filters to data loaded from yaml files. One common filter is pandoc, which uses pandoc utility to convert markdown text to html text. This yaml file
item1: "_pandoc_ This is [cbc](http://www.cbc.ca)."
item2: "This is [bbc](http://www.bbc.co.uk)."
constructs the following rendering context
item1: "This is <a href="http://www.cbc.ca">cbc</a>."
item2: "This is [bbc](http://www.bbc.co.uk)."
The _pandoc_ tag is used to invoke pandoc filter on a particular data item.
YAML front matter: mustache preprocessing
It is possible to process yaml front matter via mustache renderer before adding it to the rendering context for the current file. The rendering context when processing front matter is constructed from information stored in yaml files present in the current folder and in ancestor folders (up to the root folder).
Consider the following file.
---
template: {{__root__}}/_templates/web.html

---
This is a markdown file.
If rendering context contains the following:
__root__: /Users/foo/webThen after mustache pre-processing this file would become:
---
template: /Users/foo/web/_templates/web.html

---
This is a markdown file.
A typical use of mustache preprocessing is to specify site-wide template or render files. This can be achieved by specifying the paths of these files with respect to the root folder of the site.
Use the preprocess-frontmatter to control this behavior. The default value for this key is True.
Markdown file contents: mustache preprocessing
During markdown-to-html conversion, it is also possible to preprocess buffer contents using mustache. Consider file letter.md below:
If the rendering context contains
then the file contents will become
The preprocessed contents can be passed to pandoc for conversion to html.
Use the preprocess-buffer to control this behavior. The default value for this key for markdown-to-html conversion is True.
Blogging
Webify version > 3.1 supports blogging by adding the following special keys to the rendering context. Each key contains file lists that can be used within a jinja template to construct a blog index page.
__md__: list of markdown files found in the current folder__html__: list of html files found in the current folder__misc__: list of all other files found in the current folder__files__: list of all files found in the current folder and all its descendent trees.
Each file object in these lists contains the following keys:
src_filenamefilenameis_availablefilepathoutput_filepathfile_typeobjdataext
The relevant keys for constructing a blog index are: filename and is_available. data key allows one to look into the yaml front matter for any markdown file. This field can be used to get information about the markdown file, such as title, author, date, etc.
Any html or markdown file can use these lists to construct blog index pages. A special key __me__ identifies this markdown or html file. The following jinja snippet, for example, constructs a simple blog index.
{% for post in __md__ %}
    {% if (post.is_available and __me__ != post.filename and post.ext != ".md" ) %}
    <li><a href="{{ post.filename }}">{{ post.filename }}</a></li>
    {% endif %}
{% endfor %}
Live view
It is possible to run webify in the background. This combined with <meta http-equiv="refresh" content="5"> in the header of the generated html files creates a live view environment that is easy to use. Check out the --live switch.
MDFile Python Utility
Webify uses mdfile python utility to convert markdown files to the desired output format: html pages, LaTeX articles, or beamer slides. MDfile is built around pandoc and uses pypandoc package to perform markdown conversion. For markdown-to-HTML conversion, mdfile utility supports mustache and jinja rendering. Specifically, HTML contents from the pandoc conversion step are processed via mustache or jinja templating engine. Mustache and jinja rendering has access to this file’s rendering context (see Figure 1).
Markdown to LaTeX articles or Beamer slides
The following figure provides an overview of markdown to LaTeX article or Beamer slides conversion.
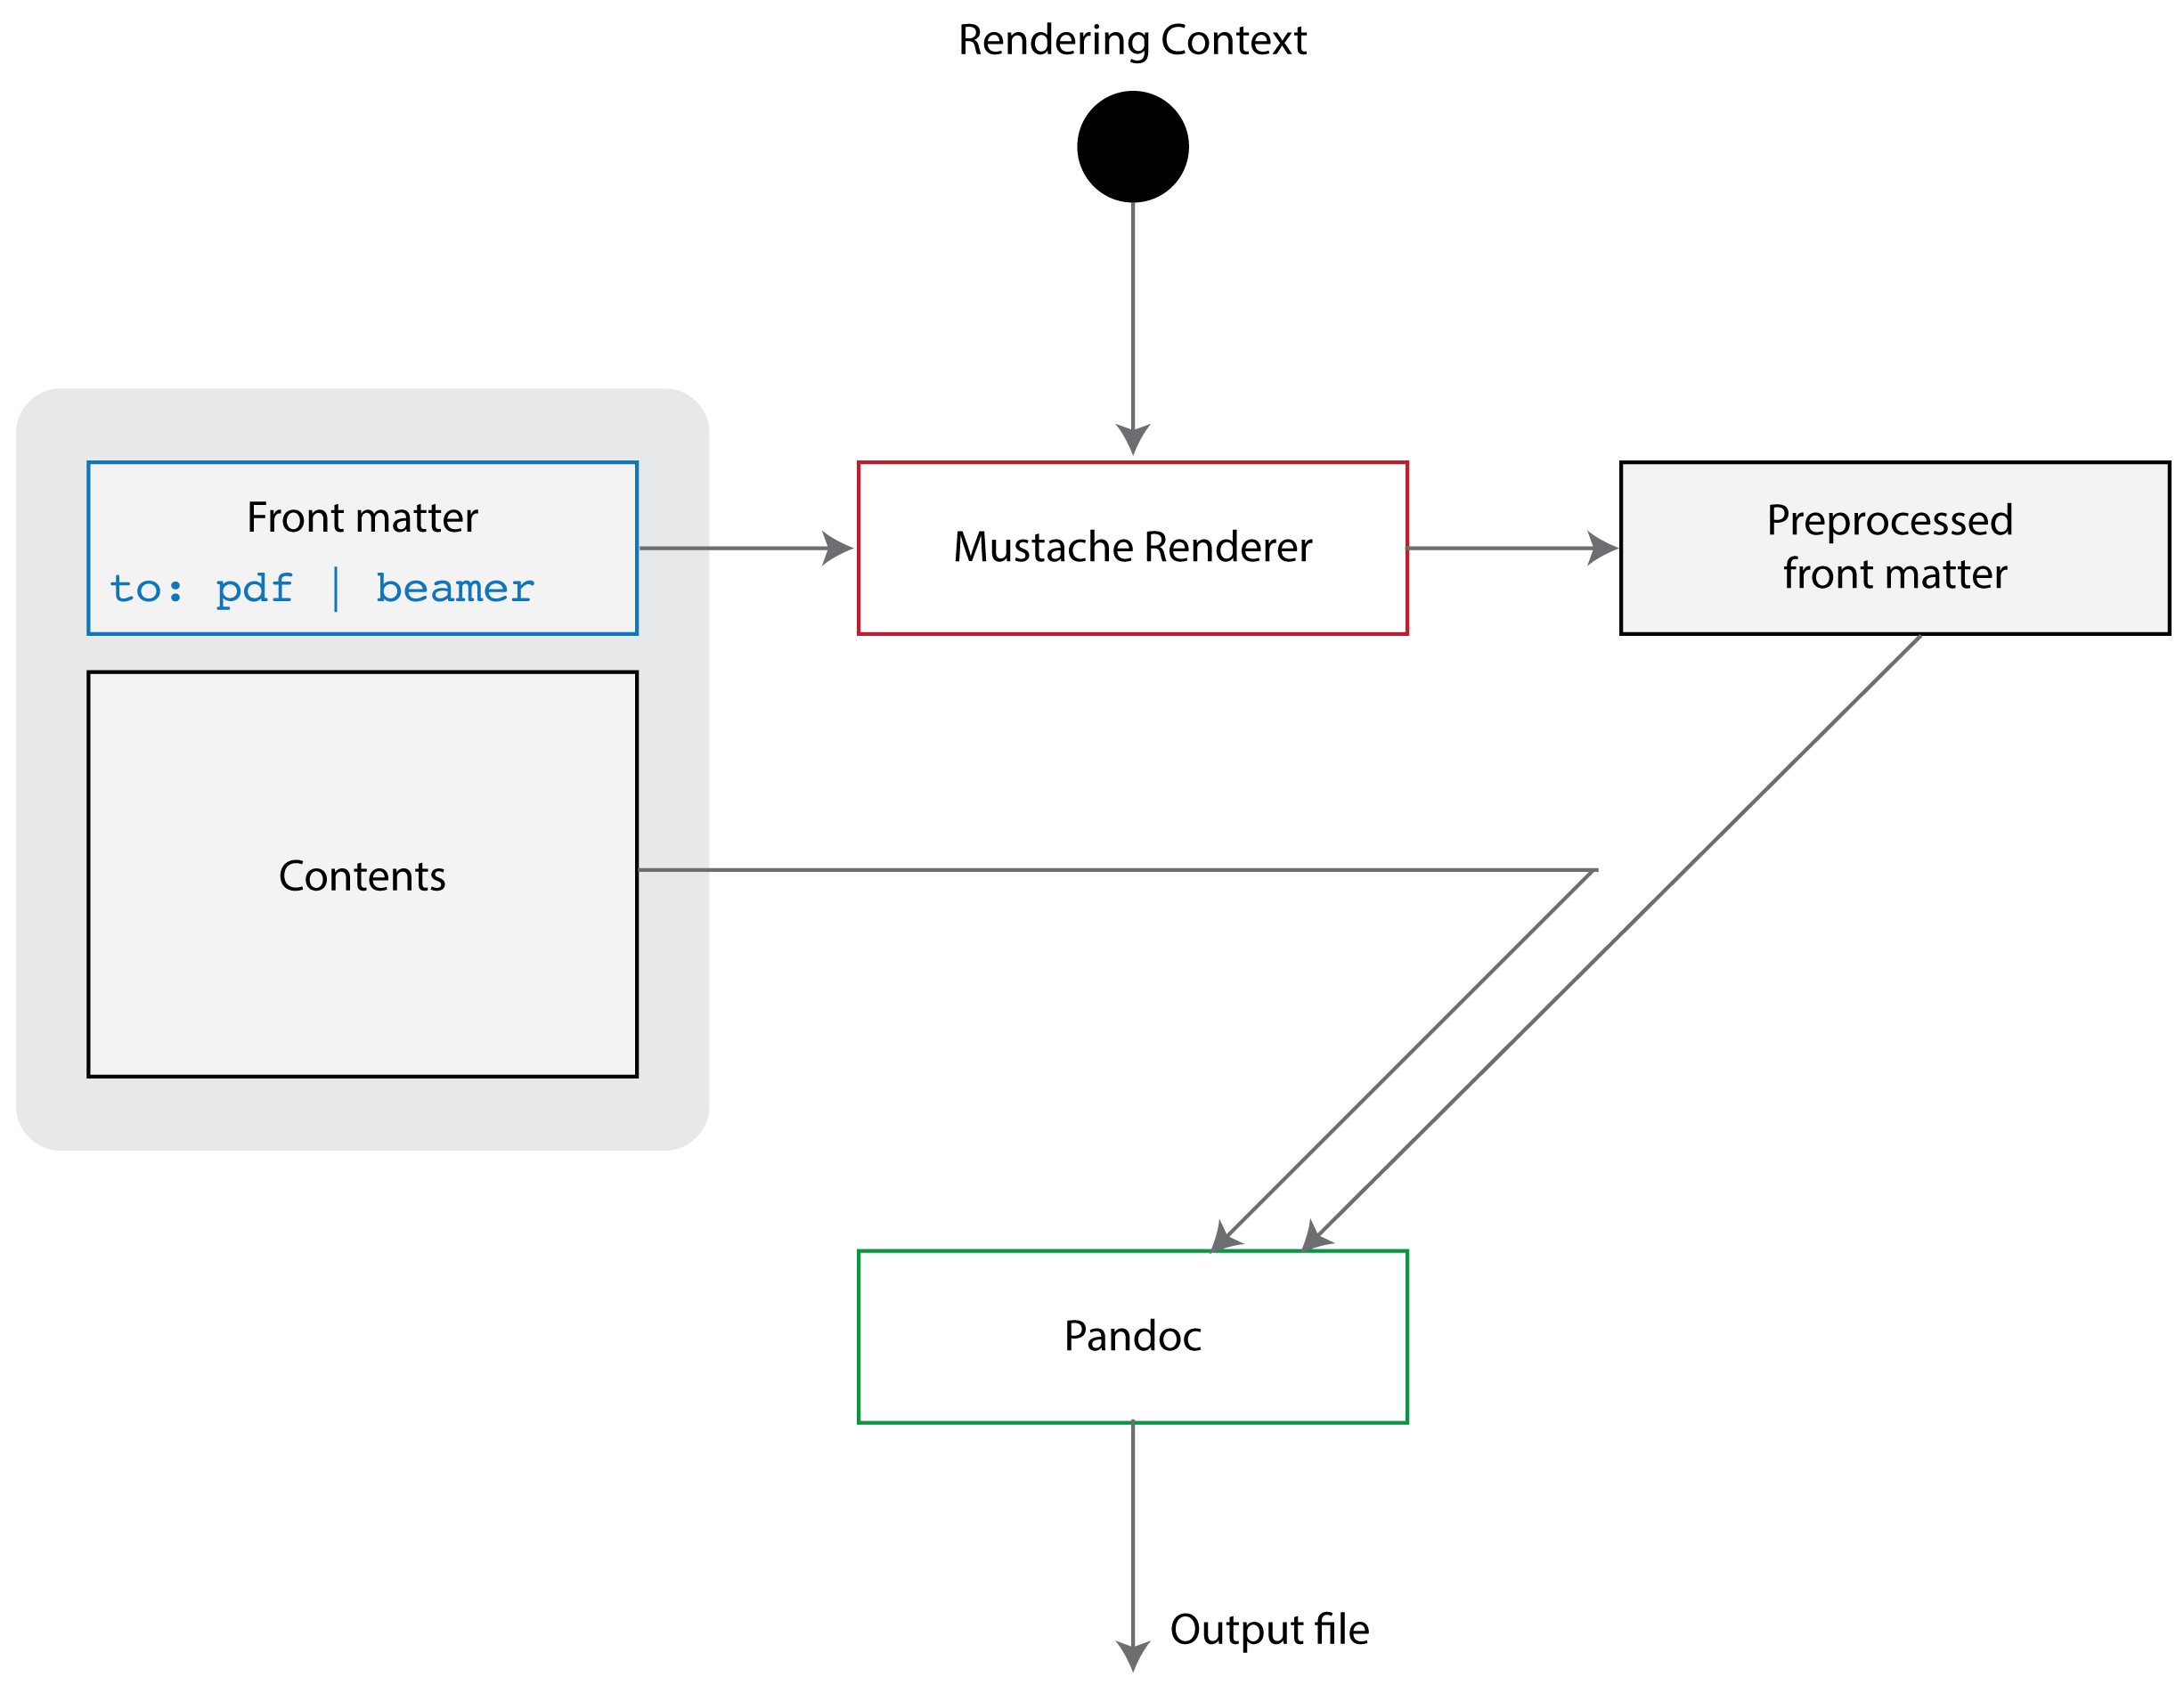
The following keys are supported during markdown to LaTeX or Beamer slides conversion. These keys controls how pandoc is used to convert the markdown file.
YAML front matter
pdf-engine:              lualatex | *pdflatex
preprocess-frontmatter:  *True | False
preprocess-buffer:       *False
create-output-file:      *True
ignore:                  *False | True
template:                *None | <pandoc-template>
highlight-style:         kate | *pygments
slide-level:             *1 | 2
include-in-header:       *None | <filename(s)>
include-before-body:     *None | <filename(s)>
include-after-body:      *None | <filename(s)>
bib:                     *None | <bibtex files(s)>
csl:                     *None | <csl file>
availability:
  start:                 *big-bang | Date and Time
end: *ragnarok | Date and Time*next to a value indicates the default value.- If
templateis not provided, default pandoc template is used. Usepandoc -D *FORMAT*to see the default template. slide-levelis only available when converting markdown to beamer slide.- If
pdf-engineisn’t specified, pandoc uses the default LaTeX distribution. create-output-filemust beTrue.preprocess-buffermust beFalse.- Yaml front matter is only preprocessed via mustache if
preprocess-frontmatterisTrue. include-in-header,include-before-body, andinclude-after-bodycan be used to specify files whose contents will be inserted as the name suggests: in the header (before\begin{document}), in the body (after\begin{document}but before everything else), and just before\end{document}. In each case, multiple files can be specified.bib: specifies the bibliography file(s).csl: specifies a Citation Style Language file that control how citations are processed.availability: this key is only used by webify.
Example
Markdown to HTML
The following figure provides an overview of markdown to HTML conversion.
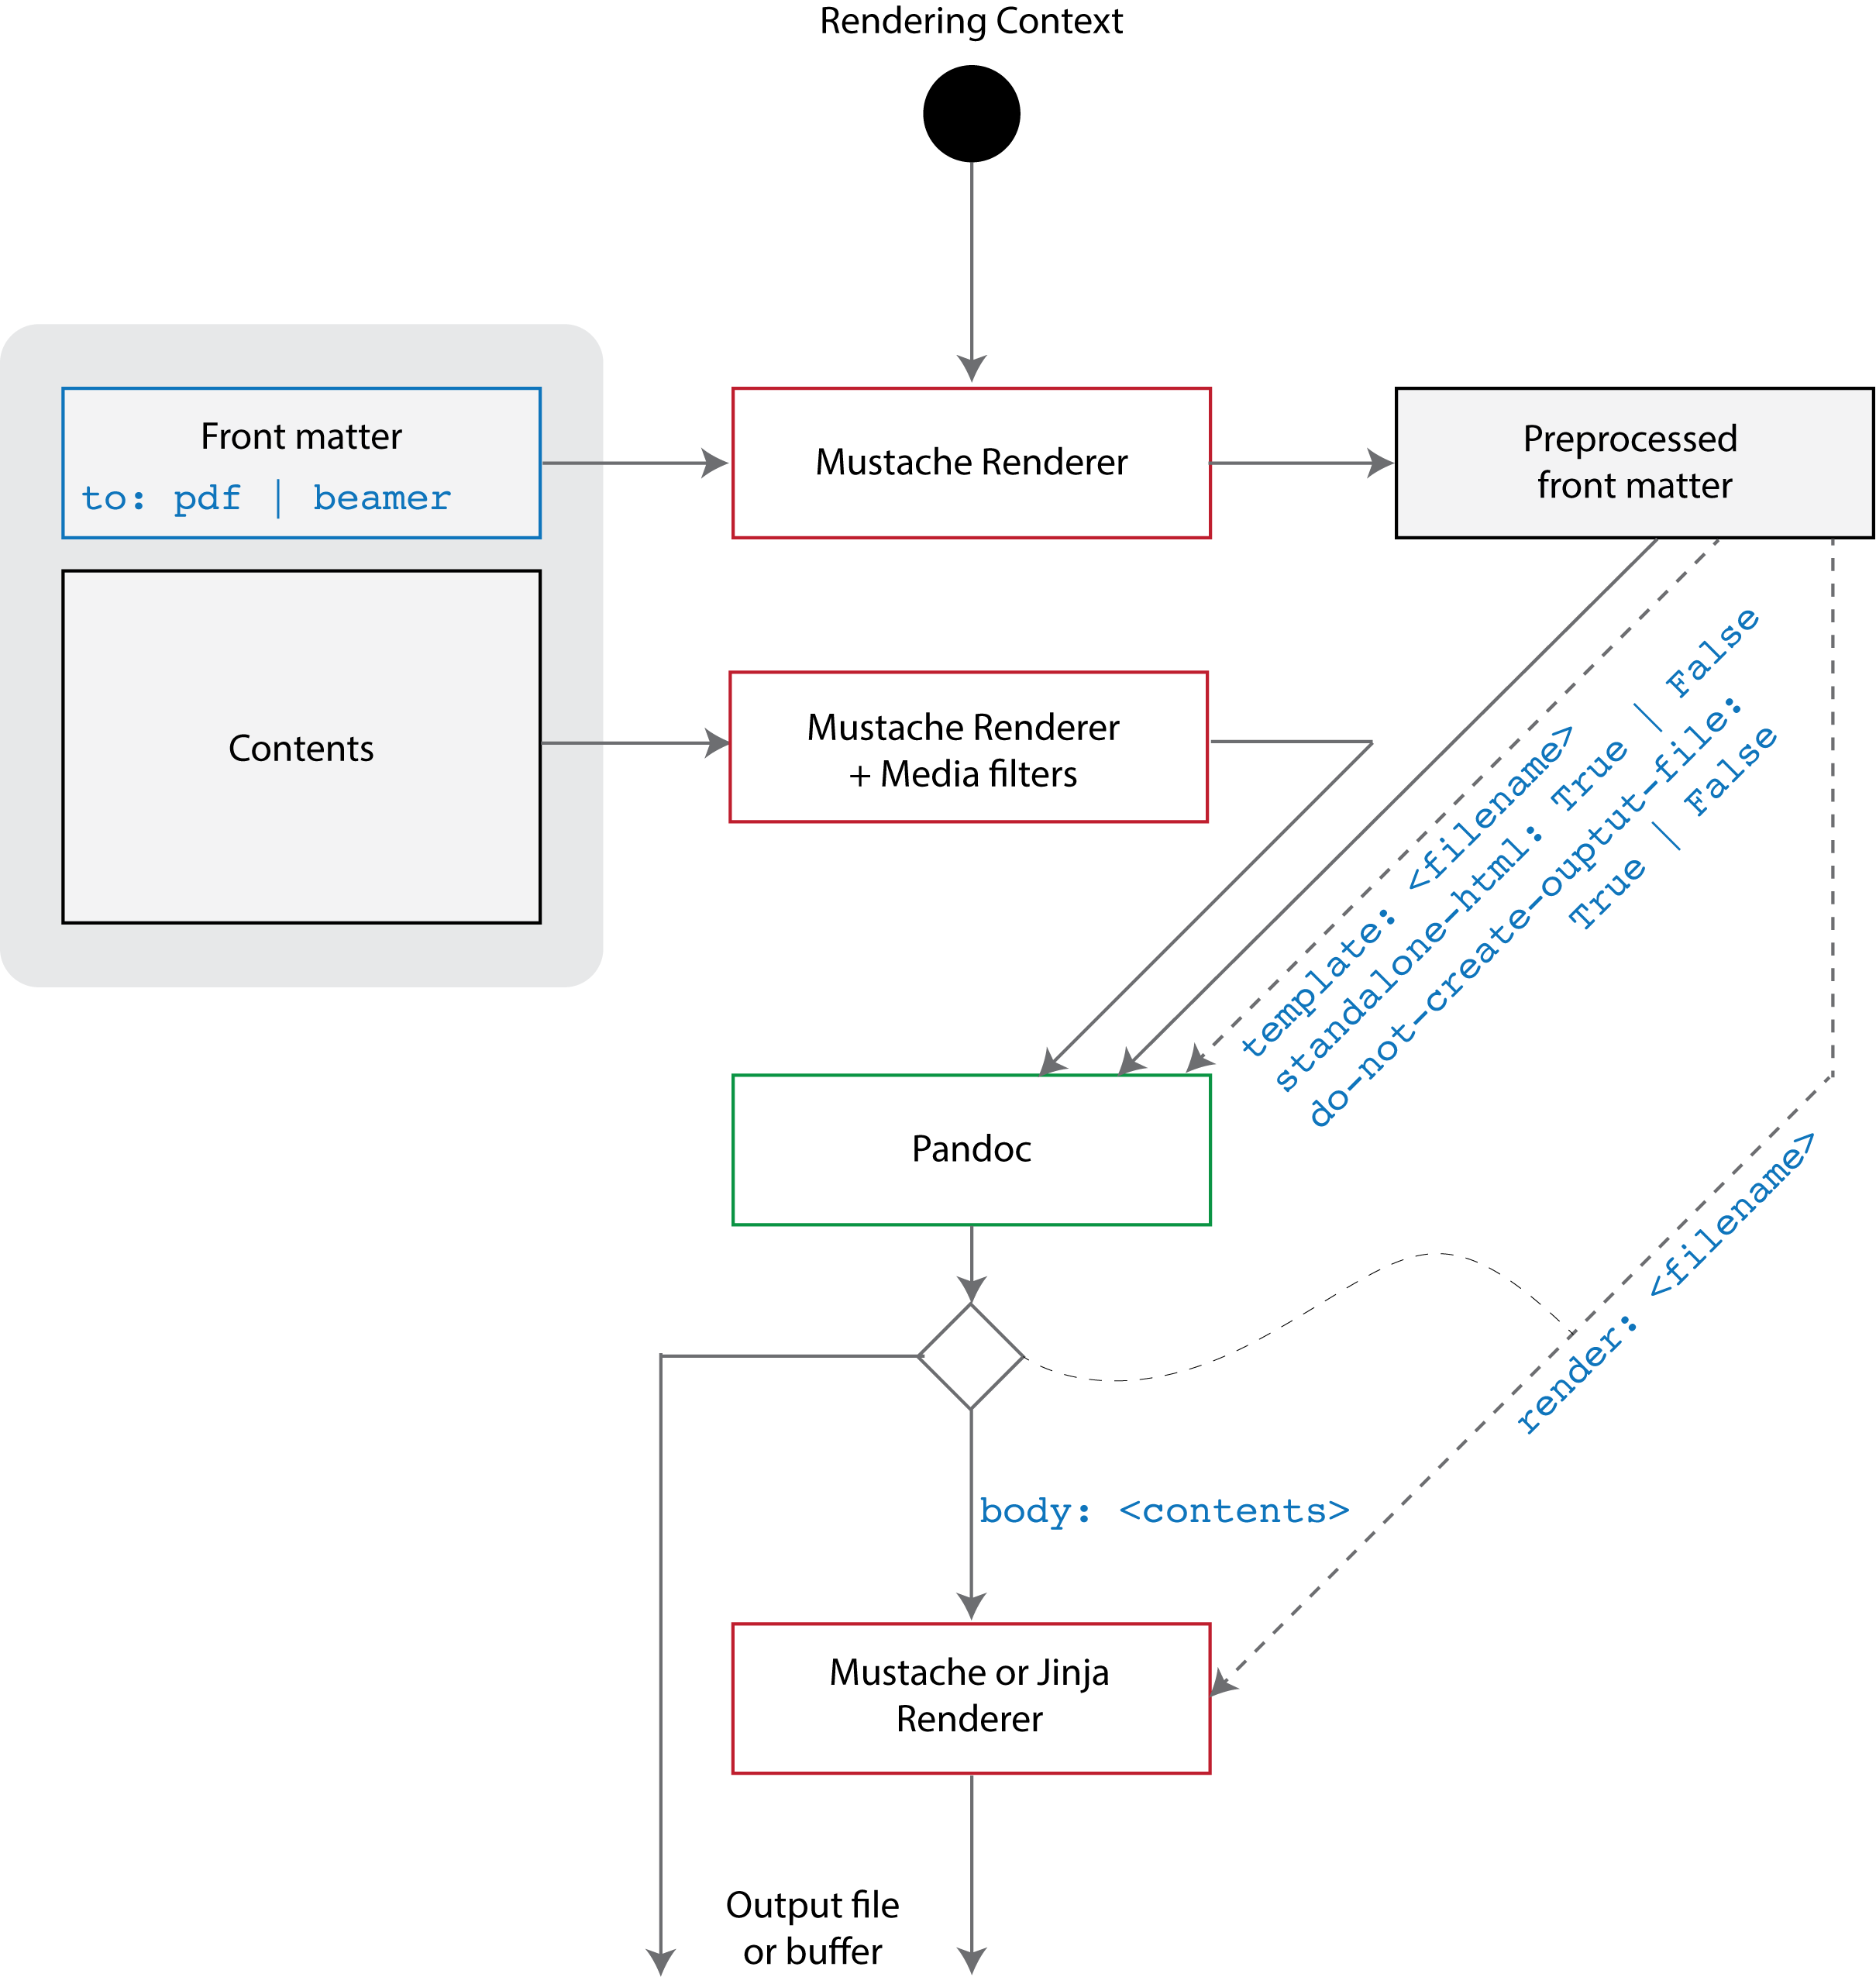
YAML front matter
preprocess-frontmatter:  *True | False
preprocess-buffer:       *True | False
create-output-file:      *True | False
ignore:                  *False | True
template:                *None | <pandoc-template>
highlight-style:         kate | *pygments
include-in-header:       *None | <filename(s)>
include-before-body:     *None | <filename(s)>
include-after-body:      *None | <filename(s)>
css:                     *None | <CSS file(s)>
html-img:                *None | <filename>
html-imgs:               *None | <filename>
html-vid:                *None | <filename>
html-vids:               *None | <filename>
availability:
  start:                 *big-bang | Date and Time
end: *ragnarok | Date and Time*next to a value indicates the default value.- If
templateis not provided, default pandoc template is used. Usepandoc -D html5to see the default templatze. - If
create-output-fileisFalse, markdown contents are saved to a buffer. This functionality is used inwebifyduring_partialsfolder processing. - Yaml front matter is only preprocessed via mustache if
preprocess-frontmatterisTrue. - Media filters tags
html-img,html-imgs,html-vidandhtml-vidsspecify mustache templates to override the default conversion of markdown media tag. See below for more details. Supported file extensions aremp4,png,jpeg,gifandjpg. - File contents can be preprocessed via mustache if
preprocess-bufferisTrue. This is done before the contents are sent to pandoc for conversion. include-in-header,include-before-body, andinclude-after-bodycan be used to specify files whose contents will be inserted as the name suggests: in the header (between<head>and</head>), in the body (after<body>tag but before everything else), and just after</body>. In each case, multiple files can be specified.css: specifies the CSS file(s).availability: this key is only used by webify.
Example
Media filters
Markdown supports adding an image (or possibly a video) file to the document via the following syntax:
It is often desireable to control how media is displayed. Use html-img, html-imgs, html-vid and html-vids tags to specify mustache templates that will replace the  with html code before further processing via mustache or pandoc. Check out webify/mdfilter folder for example templates.
MDfile utility will consume the  and constructs the following rendering context that will be available for the mustache template that will replace this string with HTML code.
The type of the media file (image or video) will determine which template (html-img or html-vid) will be used.
It is also possible to use the above syntax that works for a single file to multiple files as follows:
In this case the rendering context is:
The type of the media files (images or videos) will determine which template (html-imgs or html-vids) will be used.
Installation and Usage
Mac OSX
- Install MacTeX
- Install Pandoc
- Optionally install pandoc’s cite-proc citation parser
- Get Webify
- Setup Python. The current version of webify uses Python > 3.0. Run
pip -r install webify/webify/requirements.txtto set up Python. Optionally you can usevenvto create a standalone webify Python environemnt. See here for more details. - Add webify/webify directory to PATH environment variable. This folder contains two scripts
mdfileandwebify. Use these scripts to run the utilities.
Windows
- Install MicTeX
- Install Pandoc
- Optionally install pandoc’s cite-proc citation parser
- Get Webify
- Setup Python. The current version of webify uses Python > 3.0. Run
pip -r install webify/webify/requirements.txtto set up Python. Use your preferred method for setting up windows python environment. We also have had some success with using docker containers. - Add webify/webify directory to PATH environment variable. This folder contains two scripts
mdfile.batandwebify.bat. Use these scripts to run the utilities.
Linux
sudo apt-get install texlive-fullsudo apt-get install pandoc- Get Webify
- Setup Python. The current version of webify uses Python > 3.0. Run
pip -r install webify/webify/requirements.txtto set up Python. Optionally you can usevenvto create a standalone webify Python environemnt. See here for more details. - Add webify/webify directory to PATH environment variable. This folder contains two scripts
mdfileandwebify. Use these scripts to run the utilities.
Usage
Check python mdfile2.py --help and python webify2.py --help for usage and available command line options.
Use the --live option to keep it active in the background. (This is still somewhat experimental.) In live view, enter ‘h’ to see the available options.
The following commandline options, which are available for webify, are particularly useful for printing diagnostic information during executation.
--show-availability: list files that were not processed due to availability constraints--show-not-compiled: list markdown files that were not compiled because destination file already exists--show-compiled: list markdown files that were compiled--show-not-copied: list files that were not copied to the destination, because destination file already exists--show-ignored: list markdown files that were not processed due to their ignore flag
By default webify only shows warnings or errors. Use --verbose flag to turn on messaging; however, I find this to be not very useful when dealing with a large set of files. There is such a thing as too much information.
Copyright
Faisal Qureshi
Associate Professor
Computer Science
Faculty of Science
Ontario Tech University
Oshawa ON L1C OG5
Web: http://faculty.uoit.ca/qureshi